Tuesday 27 May 2008

REVEAL: a showcase of quality hand-made craft

I mentioned this a little while ago, but some of my badges are going to be in an exhibition!

It's called REVEAL - a showcase of quality hand-made craft.


It's on from Sunday 6th to Saturday 12th July, 10am to 5pm every day, and entry is free.

It's at the Henley Exhibition Centre.

The website has a gallery of work by all the exhibitors - I'm really looking forward to going along and seeing all the lovely things!

Monday 26 May 2008

A lovely compliment.

I wore the hawaiian halter dress to work on Saturday. One of our customers paid me the greatest compliment, by buying the same pattern and fabric so that she could make one for herself. :)

I've also had an email from , saying some very sweet things about the slippers I made for her.

She also gave me some really useful feedback about wearing them (quoted with permission), which will hep me to adjust the pattern for the next pair:

day 1
they are snug but not uncomfortably so, just snug as in brand new and all mine
don't stay on heels though, when you step up you heel flops out, almost like walking in flip flops. (doesn't bother me much though) the back of the slipper doesn't get caught and mashed down when you step down, so up side is your foot settles right back in where it should be when you step down.
seems like the sole could do with a 1/2 inch more in diameter all the way around, not sure why, maybe just because the foan isn't smashed yet.
feels like the satin part is getting wrinkled under my toes, may also be the foam adjusting

day 4
sides have "broken down" because my foot has shifted in the left one so every couple of steps I have to adjust my foot so it is hitting the pad outline instead of my heel being off the left back edge.
no more satin wrinkle under toes, foam is only mashed under my big toes and ball of my foot, but that and the rest is still plenty to shuffle about in. feels like i have socks on not slippers, I like that.

day 6
still same as day 4 so I think this is their stable place of being, the foot shifting I think could be fixed with the back coming off, maybe with some elastic similar to your brocade ones? I think the heel height needs to be almost an inch higher for me at least and then have some elastic.
I still absolutely love them and hardly ever take them off so thank you and hope this helps.


These are pretty much exactly the same things that I experienced with the monkey slippers, so I'm getting a really clear idea of what kinds of changes need to be made:

  • Higher at back of ankle

  • Elastic at back of ankle

  • More ease added to basic foot pattern


I'm busy sewing a coat at the moment, so slippers will have to wait a little while. I'm realy looking forward to getting back to them though, especially now that I've got my John Peacock shoe sourcebook to inspire me!

Sunday 25 May 2008

Simplicity 4072 - the cupcake duro!

Finally, I have finished making Simplicity 4072! I've been working on this all week, and it took far longer to put together than I'd anticipated. I'm feeling thoroughly grumpy about this dress at the moment. It feels like a bit of a Monet - from a distance it looks great, but close up it all goes a but fuzzy. Every time I look at it, I see something that I could have done better.

I'm hoping it'll redemm itself when I actually put it on - although that neckline seems awfully low! I might find myself digging out the leftovers, to make a cupcake-print modesty panel.

Cupcake Duro - the front! Cupcake Duro - back


The cupcake print is a Rowan quilting cotton, also available in other colourways from eQuilter. The plain pink is the Bishopston organic cotton, in Raspberry. It couldn't be a more perfect match for the pink of the cakes!

I do like the look of this dress very much. I bought the pattern a long time ago, inspired by Erin's Darth Vader dress, but I didn't find the perfect fabric combination until I put these two together.

I did find it quite difficult to make though, which surprised me. There are no sleeves to set in, there's no zip... but there is a lot of "pivot at small dot" and "clip to curve", and the neckband was an absolute so-and-so to put on neatly. You're sewing a convex curve to a concave one at the back of the neck, and I had to check at least three times that I was definitely sewing it all together the right way round!

If it stops raining over the Bank Holiday, I'll ask Paul to take some photos of me cavorting about in my new dress. If it looks good on, I have the perfect fabric for at least two more...

Friday 23 May 2008

Covered in bees!

It is one of the lesser-known side effects of having fluorescent pink hair, that when you go for a walk in the woods, an assortment of bees may attempt to extract pollen from your head.

Thankfully I am not allergic to bee stings, and I am a huge fan of bees generally, so I don't mind if they land on me. :)

This little fellow was far too busy foraging inside the iris to pay any attention to me:

IMGP1366

But this guy?

IMGP1373

When he was done with the rhododendron, he decided that my hair looked tasty. This bee was massive - a good inch and a half long. It's quite difficult not to be frightened when a bee this big wanders about on your head, but he got bored and flew away quickly enough.

I also saw several ducks:

IMGP1362 IMGP1364

While I was photographing the coot, Mrs Mallard sneaked up behind me and stuck her head in my handbag!

You can see the rest of the photos from my walk on Flickr:

IMGP1352 IMGP1356 IMGP1357
IMGP1362 IMGP1364 IMGP1365
IMGP1366 IMGP1373 IMGP1376
IMGP1379 IMGP1383 IMGP1393
IMGP1394

Tuesday 20 May 2008

Finishing a couple of dresses...

In a sudden flurry of productivity (i.e. I needed to have the dress forms ready for my next projects!), I've finally finished two dresses for myself:

McCalls Hawaiian halter dress Simplicity Fish Dress!


On the left is McCalls M4826, view A.
As you can probably tell, my favourite thing about this dress is the pockets!

On the right is Simplicity 3673, view C.
It's made in my beloved fish fabrics from Cia's Palette.

(Please excuse my grumpy face - I'm not feeling very well.)

Sunday 18 May 2008

Lots and lots of badges.

Today I have been mostly making lots and lots of badges.

Badge mix-up


This probably wasn't a very clever thing to do with a bad wrist, but I needed to get some photographs taken to send to Lauren Denney. She's organising an exhibition of local artists, and she saw my badges on Etsy and invited me to take part!

Lauren is a ceramic artist, and the exhibition will take place in Henley, from the 6th to the 12th of June. Rest assured that I will be advertising this like mad as soon as I have more details!

I'm submitting three different types of badges to the exhibition, all made from recycled paper ephemera:

Map badges
Damaged Ordnance Survey maps (this one's of Sheffield)

Textbook badges
Discarded Library textbooks

Pin-up badges
An out of date Gil Elvgren pin-up calendar


Some of the badges will be sold singly, simply pinned on to individual Moo cards. Others will be grouped into sets of four - I need to design the packaging for these, and work out how they're going to be displayed.

I'm on the reserve list for the Rising Sun Art Market the day before the exhibition opens, so I'm planning to make even more badges over the next three weeks, so that I can also sell them at the Art Market if I'm lucky enough to get a place.

I need to make lots of pillowcase tote bags for the Art Market as well, not to mention having a jacket and dress fitting day in the meantime, so it looks as though I've got a busy time coming up!

Saturday 17 May 2008

Simply Knitting.

I miss knitting. I haven't done any for ages, because I've hurt my wrist. It's driving me mad - how are you supposed to watch films and TV, if you can't knit at the same time?

This month's Simply Knitting magazine has just plopped onto my doormat, and now I miss knitting more than ever! I didn't blog about Issue 41, because none of the patterns particularly grabbed me. (I was very excited about the shiny blue chunky cable needles though!) Issue 42 has a couple of patterns which appeal to me a great deal, and I am currently bemoaning the fact that I don't have any aran weight wool in my stash.

Okay, I lied. I do have some aran weight wool. It's Debbie Bliss Soho, which is multicoloured, and I think the twisted cables on the front of Kirstie McLeod's pretty cardigan pattern would disappear in such a loud yarn. I need something simple and plain, for this one. Simply Knitting are very naughty - the magazine includes a free pack of three lovely wooden buttons, which of course are perfect for this pattern! So, of course, I now need to go out and buy some wool.

I've just realised, in fact, that I've made it five months into 2008 without buying any wool at all! (Well, one lonely ball for the Kool Aid experiment, but that hardly counts.) I went on a shopping spree in the John Lewis sale at the end of last year, and bought a veritable mountain of wool that I haven't even touched yet. (Stupid wrist.) If you're a member of Ravelry, you can see what I'm hiding in my stash. I thought I had very specific plans for each of my stashed yarns, but of course I keep changing my mind. Oh, and I knitted a pair of socks from the Louisa Harding Kimono Angora, which I completely forgot to show you!

The other pattern that I really like from this issue of Simply Knitting is a child's jumper. It's taken from Bergere de France's Tricot Baby magazine 510, and it has a little viking on the front! Bless him! Not having any children to knit for, I wonder whether Paul would like a big jumper, with a little viking on the front...?

Friday 16 May 2008

Experimental slipper-shoes...

So, I've made a few pairs of slippers now, and they seemed to go quite well. I thought I would attempt the next stage in the experiment towards being able to make my own shoes.

Blue brocade slippers - an experiment! Blue brocade slippers - an experiment!


In the left hand photo, the slippers have completely finished uppers. At this point I would normally attach a felt sole, and that would be it! I decided to try a cork sole (made from an old floor tile!), so you can see it laid on top of the slipper.

I tried to sew the cork directly to the upper, which did work, but it left me with several rather painful holes in my fingers from pushing the needle through the cork! Eventually I reasoned that if I could sew through cork by hand, surely my sewing machine would make a better job of it. I sewed the cork sole to a piece of drill, and used heavy thread to turn over the edges.

Blue brocade slippers - an experiment! Blue brocade slippers - an experiment!


This gave me a strong sole which could then be sewn by hand directly on to the upper. I removed the plain cork sole, and made them both this way.

The soles are now black, having been covered with a coating of liquid latex. This makes them non-slip, and also fairly waterproof. Several more coats will be needed if they're going to be suitable for walking around outside - and of course the uppers aren't waterproof at all, being brocade!


There turned out to be quite a few problems with this pair, although now I've identified the difficulties I should hopefully be able to avoid them next time:

  • The slippers are too small.
    I hadn't allowed for the fact that so many layers would take up quite a lot of space. I also hadn't allowed enough depth in the pattern for my toes. I can easily amend this for the next pair, by adding extra allowance into the pattern, particularly at the heel and toe.

  • The slippers are uncomfortable at the heel and toe.
    In the first picture, you can see where the seam allowances from the upper are folded round under the sole, and stitched in place. Even though I graded the seams, you can still feel a ridge under your foot from this extra fabric. I need to grade the seams more closely next time, and trim a little more away around the curved areas.

  • The sole was difficult to sew into place.
    Even after I'd given up on trying to hand sew though the cork layer, it was still quite tricky to sew the sole into place neatly. I now understand the purpose of a welt. It bridges the gap between the upper and the sole, and gives you a neat way of finishing the join which avoids having stitching on the bottom of the shoe which would eventually wear away. However, adding a welt might compound the problem of having too many layers of seam allowance between the upper and the sole.


Whilst it's frustrating to have spent time making an uncomfortable pair of slippers which don't even fit, I've definitely learnt enough from this process to be looking forward to making the next pair!

Tuesday 13 May 2008

That's better!

After the slight technical difficulty with Daniel's slippers I did a bit of unpicking and attached the soles in a slightly different way.

Here they are, with big brother Edward's skull slippers, enjoying the sunshine:

Slippers for Daniel & Edward


Both of these pairs were made from drawings of the boys' feet.
I'm slightly concerned that Daniel and Edward won't be heavy enough to compress the 1" foam inside the soles, and that the slippers will be a bit tight as a result. They're only little! At least their slippers will be nice and squashy though.


Next up is a pair for myself, following a flash of inspiration that I had whilst watching a documentary about Riverdance over the weekend. Would anybody be the slightest bit surprised if I told you that I spent the entire programme watching the dancers' shoes?

Monday 12 May 2008

Shoe Envy.

I really must get a move-on and work out how to make little canvas shoes.

The Nice Man Who Knows About Feet told me that I shouldn't be wearing Converse any more, so I sold my yellow pair with daisies and ladybirds to a friend. I still have a pinstripe pair that didn't sell, and I keep looking at them, and wondering whether the next time I put them on they'll magically be okay for my feet.

(Note to self: This didn't work with the Doc Martens, so it seems unlikely that the Cons would be okay.)

Because I am a sucker for punishment where shoes are concerned, I've just been to look at the Converse section of the Schuh website.

Look! They have Converse with Little Red Riding Hood on them!


I immediately want to make a little red gingham dress to wear with these.

I'm not so keen on this year's ladybird design, but I do rather like this blue and yellow floral pair. I'm sad that these Sailor Jerry low-tops are men's, because that means they don't come in my size. They're so pretty that I'd happily have worn these with all my summer skirts.


Mind you, if I'm looking at Converse, I ought really to be looking instead at Ethletic Sneakers. It would be really easy to buy a cream pair and paint on them, and then I can have whatever design I like, as well as supporting Fair Trade and renewable resources.

Having said that, Finest Imaginary has just pointed out that the Little Red Riding Hood Converse are part of (PRODUCT) RED, which has a global fund to provide anti-retroviral drugs, to help fight the AIDS pandemic in Africa. I'll be looking out for that one red eyelet if I do decide to buy a pair of Converse in future.


I'm still quite a few steps away from being able to transform the slippers I've been making into outdoor shoes. I just need to resist the urge to give in to temptation in the meantime!

Sunday 11 May 2008

A Slight Technical Difficulty...

Today I've been making slippers for Daniel, my colleague's smallest son.

I've been following the instructions from Kwik Sew pattern 3323.

The Kwik Sew pieces are simple ovals, which can be worn on either foot, so I drew out my own pattern pieces to make them the same shape as Daniel's feet. I then assembled all the pieces in the right order, and things seemed to be going pretty well!

Daniel's slippers


On the left is one completed upper, and in the middle its matching sole. The upper is two layers of fleece, with a layer of batting in between. The sole is made from 1" foam, sandwiched between a layer of fleece and a layer of drill. On the right is what happens when you pin the upper and sole together, right sides in. The idea is that you sew most of the way around the edges, leaving a gap at the heel to turn the slippers through.

Admittedly I did use slightly thicker foam than called for in the pattern, and I had been thinking that maybe the layer of batting was a bit superfluous with the fleece. I could see that the sole/upper piece was quite thick, even after I'd trimmed the seam allowances off the foam. I was expecting this part of the sewing to be a little tricky...

Daniel's slippers


...and I was right. Oops.

The needle's not only snapped, it's also curved! This is apparently what happens when you try to squash six layers of fabric, plus an inch of foam, through your average domestic sewing machine. I don't recommend it!

Next time I think I'm going to leave out the batting layer, and I definitely need to use only ½" foam if I want to go with this particular construction method!

For this pair, I'm going to do a bit of unpicking, and then use the method where the final outer layer of the sole is sewn on by hand. Sometimes a bit of good old-fashioned hand sewing is the best way after all.

Saturday 10 May 2008

More slippers, and an exhibition!

O'Retha, your slippers are finished! I hope you like them. :)

This pair were made to fit a drawing of O'Retha's feet, which she sent to me using the Power of the Internet. I now need to post them across the Atlantic, and hope that they fit when they get there!

Tiger slippers!


These are made in the same way as the monkey slippers. The uppers are made from plush tiger fabric lined with gold satin, and interfaced with a layer of batting for extra softness. The inner soles are made from gold satin and white cotton, with a layer of 1" foam and a piece of buckram sandwiched in between. The outer soles are felt, edged with blanket stitch in a strong buttonhole thread.

I learnt a few things while making this pair - namely when it's better to use a curved upholstery needle, and when a straight one is more effective.

Next up will be two little pairs for Daniel and Edward, my colleague's sons. They'll both be made of polar fleece, so they should be really squashy and cute!


Oh yes, the art exhibition!

I've received an email via Etsy, from a local ceramic artist. She's asked me whether I'd like to have some of my badges included in an exhibition that she's putting on in Henley in July.

I've mailed back to ask for more information, but this is the first time I've been invited to take part in anything like this, so I'm very excited about it!

Tuesday 6 May 2008

Scalloped skirt - finished!

Remember the scalloped skirt that I started working on the other day?

I've just finished it, and I'm really pleased!

(Please excuse the gormless squinty face - that's the first time I've used the self-timer on the camera, and I couldn't tell when it had taken the picture!)

Scalloped skirt - pink Scalloped skirt - purple


Ta-daa! Two views of the same skirt. This is the first garment that I've made from the Bishopston fabrics, in Raspberry and Wine.

It's bagged out at the scalloped hem, so there are no seams at all on the outside. This makes it conveniently reversible, for two skirts in one! It also holds the two layers neatly together, so they can't slip about or ride up. As with all of my skirts, it's elasticated at the waist for comfort.

Now, if I can just work out how to put pockets in the side seams of a reversible skirt, I'll be very happy indeed.

As soon as I've asked Paul to take some photos of me looking slightly less confused, I'll be adding this one to the shop. (Not this one - this one's mine. But you'll be able to order one in your size, in any of the Bishopston colours.)

Kaffe Fassett Fat Quarters

Look what I've got!

Paul's Mum very kindly gave me a set of ten fat quarters. Aren't they beautiful?

Kaffe Fasset patchwork fabrics


They're Rowan fabrics which were designed by Kaffe Fassett, and hand woven in India with the support of Oxfam.

They go absolutely perfectly with the Bishopston fabrics, so at the moment I'm thinking of some lightweight cotton coats, with fabulous striped collars and pockets. Maybe also covered buttons, if I can squeeze enough fabric out of the fat quarters.

I'm enormously grateful to Stef for passing these on to me. Look at the colours! They're so pretty.

Sunday 4 May 2008

Working on the website.

Today I have finally taken the time to give the Design By Claire website a bit of a sort-out. I took the shop down a little while ago, to experiment with Big Cartel and Etsy, but I've finally decided that I want to keep a web shop on my own site as well.

So, here it is:


It still needs a bit of work, but at least you can go there and buy things, which seems to be the primary aim of having a shop in the first place!

Originally the web shop was on hold until I'd decided what I was doing with the Bishopston fabrics. As it happens that's taking a lot longer than I'd planned, and it was silly not having a shop set up for all the things I'd made already.

I do have more plans for a more professional shopping set-up, using Zen Cart. Unfortunately the process of setting up Zen Cart's templates is giving me rather a headache, so I'm taking that slowly too.

In the meantime I'm concentrating on making lots of new and exciting things - mostly slippers for all the people who volunteered to test them out for me! I also have plans for more accessories like the monkey belt, and lots more tote bags from pillowcases. I had a little shopping spree on Ebay last week, and I have Dennis the Menace, Wombles and Henry's Cat duvet covers and pillowcases on their way!

Friday 2 May 2008

The Scalloped Skirt - an Idea.

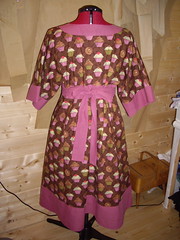
I've been wanting to make some kind of a scalloped skirt for ages.

I bought this reproduction vintage Butterick pattern a few years ago:

Butterick 6702 - inspiration.


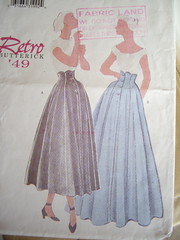
I never got around to making it, because the tutor on the only sewing course I've ever taken deemed it unsuitable for a beginner. I'd already cut out the pattern though, and by the time I felt as though I wasn't a beginner any more, it was several sizes too small. Eventually I'll fiddle about with it so that I can make it in my size, but for now, I'm happy to be inspired by the scallops at the waist.

Then last week I saw this amazing Rob Ryan skirt from Clothkits.
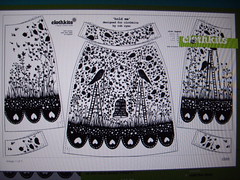
Clothkits Rob Ryan skirt - inspiration


Remember Clothkits? The ones with the seventies-style matching mother and daughter dresses, and the little dolls? Well, they've recently undergone the most amazing transformation, and their website has some amazingly cute clothes and dolls to sew!

I was showing this skirt to Paul, and he asked whether you were supposed to cut it out "all wiggly" at the hem. Well, I guess you're not supposed to, but what's stopping you?

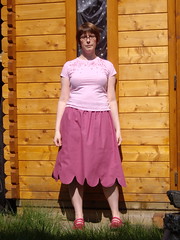
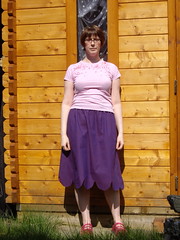
I've been wanting to make a fully lined and completely reversible skirt for ages. It suddenly struck me that a skirt with a scalloped hem would be absolutely ideal for this. You have to join the two layers together at the bottom to make the scallops, so you immediately get a fully lined skirt. All you have to do is be neat and tidy about adding an elasticated waistband (have you any idea how difficult it is to buy a reversible zip?), and you magically have two skirts for the price of one!

I traced out my elasticated skirt pattern in my size, and set about adding the scallops to the hem.

Mathematically challenged.


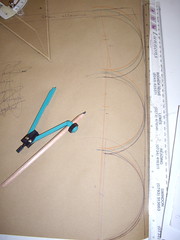
As you may have noticed, I am not a mathematician. I used to be pretty good at technical drawing, but this ability with a pencil and compass appears to have deserted me, as it took five attempts to draw out the scallops to the right size!

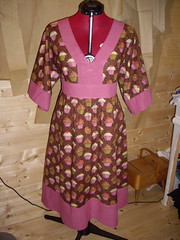
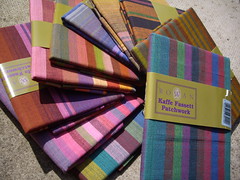
Over the weekend I plan to make a first draft of this skirt, and see how it turns out. If it goes well, I have plans for the Bishopston organic cottons...