Tuesday 29 July 2008

Simplicity 2927

This morning I had a very productive time drafting a pattern for a pair of leggings. By lunchtime I'd transformed a piece of lovely cotton jersey that I bought from The Cloth House several years ago, and in the afternoon I started on a simple tunic to go with them.

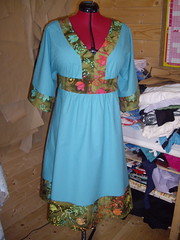
Say hello to Simplicity 2927:

Simplicity 2927

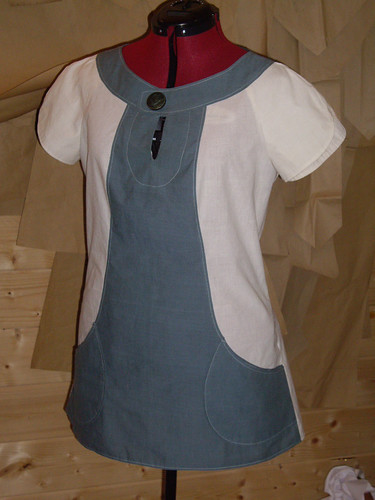
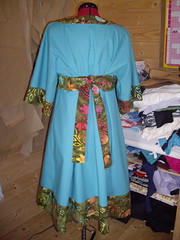
It's not finished yet, mostly because I was taken by surprise at how complicated this little dress turned out to be!

It's one of Simplicity's Project Runway patterns. As it happens I've never actually watched the TV show, but I'd sort of assumed that the point of the patterns was to encourage young wannabe designers into sewing their own clothes.

We'd already discovered at work that the patterns are quite difficult to read. The back of the envelope is quite confusing in terms of being able to work out what you need (more so than normal!), and the instructions often seem unnecessarily complicated.

This particular design comes in a choice of two lengths, has three different sleeve styles, and optional pockets. Directions are also included for piping all of the seams. Throughout the pattern you're sewing concave to convex edges to make the curved side front seams and the neck band. The sleeves are either faced or bagged out. The front facing's rather fiddly, and the sleeves and neck band were a nightmare to put together neatly.

I sew three or four days out of every week, and I found this pattern rather difficult!

I certainly wouldn't recommend it to anyone who didn't already have plenty of sewing experience - and plenty of patience. It took me around six hours to get this far, and I was expecting it to take about half that time.

As I was putting this little tunic together, I was a bit worried that my choice of colours was going to make me look like a dental nurse. Looking at the photo though, I think the style is quite cute. Slightly sixties-looking, and I think the button makes all the difference. I don't know whether that's going to be my final choice of button - I need to see the colours in daylight - but I think whichever button I choose, it needs to be a big one.

All I need to do now is put in the zip, finish off the last few loose ends, and give the whole thing a good pressing. I'm disappointed that I couldn't get it finished today, as I was planning on wearing it to work tomorrow, along with my new leggings!

Still, I'd rather do it properly, than try to finish it in a hurry and make a mess of it.

I keep going back to these little raglan tunic patterns, so I guess my next step is to draft one of my own. Whatever I come up with, I do know that it won't have a neckband, and it won't have such complex curves! I'm still in love with the pockets though.

Tuesday 15 July 2008

Decisions, decisions...

My next dress mock-up doesn't need to be ready until the end of August. Between the next cupcake dress, some slippers, more tote bags and maybe a corset or two, I think I might finally have found the time to make myself a new coat. (Yes. In the middle of summer. I know.)

I bought this Waverley flamingo print fabric last year, and I keep not-deciding what sort of coat it should be. I bought the Indygo Junction pattern and the giant button specifically with this fabric in mind, but having just finished Jenny's brocade coat, I am extremely tempted to make this in a piratey style!

Flamingo coat...

I've also been searching high and low for flamingo-shaped buttons, and finally I have managed to come up with these:

Flamingo buttons!

They're from a website called Uptown Flamingo, and they're $4.95 for two, or $24 for 12. I might drop them an email to ask about shipping costs. How could I make a flamingo coat without even trying to buy some flamingo buttons?

There should even be enough fabric left over to make a bag. Or a hat.

A hat! With flamingo buttons on the side!

Sorted.

We have a plan.

The brocade coat is finished!

I know these photos aren't of the best quality - it's pretty dark out there today, and for some reason my camera refuses to focus on this fabric properly. Hopefully I'll be able to take some better pictures at the weekend, when Jenny comes to collect it.

You can see all the pictures of the coat as it progressed over at Flickr.

For those of you interested in the details, it's made from John Lewis Classic Brocade, from the furnishing fabrics department! The lining and contrast details are made from polyester satin-backed dupion, and the interfacing is horsehair canvas. There are sixty-four buttons in total.

The first picture shows the inside of the coat, because that's where most of the time went! The facings and the hem were hand-stitched, and you can see the twenty internal buttons at the centre front. As well as balancing the weight of the heavy metal buttons on the outside, they also have another useful function. Jenny can fold the braid loops to the inside and fasten them around these little buttons, if she wants to wear the coat open. That way the loops don't catch on all the buttons, or get in the way.

Jenny's pirate coat - the inside!Jenny's pirate coat - back
Jenny's pirate coatJenny's pirate coat - FINISHED!


The pattern is Simplicity 3677, their women's "Pirates of the Caribbean" costume. I added the lining and the pockets, and used different methods for the finishing. The only other deviation I made from the pattern was to make a full bust adjustment, for a better fit.

I can't wait to see Jenny try it on!

Wednesday 9 July 2008

Buttoned up...

I was hoping to finish Jenny's coat today. Six hours of hand-sewing later, and I realise that I have vastly underestimated how long it would take to sew on all the buttons!

Today I have stitched down the facings to the lining, and bound the bottom edge of the coat. Oh, and sewn on forty buttons. Yes, forty! (Twenty of them are on the inside.)

Jenny's Pirate coat - now with buttons!

Twenty-two more buttons to go, and then all I have to do is press the cuffs and turn up the hem.

I honestly have no idea how many hours I've put into making this coat. more than I expected, but then I always underestimate how much time it takes to do the finishing touches. Somehow this coat seems to have been made up entirely of finishing touches!


Even though the coat isn't mine, I should probably to confess to having tried it on. I had a sneaky flounce around the Shed in it, and it's absolutely gorgeous to wear. It's definitely on my list as one of the things I want to make for myself, when time permits. I wonder how it would look in pink PVC with little white spots...?

Tuesday 8 July 2008

Poked and prodded.

I've been a bit quiet here lately, having spent a week being poked and prodded and scanned and x-rayed, only to reach the conclusion that despite feeling very poorly indeed, there's apparently nothing wrong with me. Reassuring, but frustrating at the same time.

In between ultrasounds and blood tests and trips to the doctor, I have been making this:

Simplicity 4072 Simplicity 4072


It's Simplicity 4072, the same pattern as the cupcake dress, and this one's for Nicola.

The cupcake dress is in fact for sale, if anyone's interested? It's a size too big for me, and is sadly not very flattering to my figure shape. It needs to go to someone with a more generous cleavage than mine!

Overbust measurement will fit up to 38", underbust/empire waist measurement is also 38", but this pulls in at the back with the ties. The dress has been worn and washed once. £45.