Tuesday 29 April 2008

Koi circle skirt...

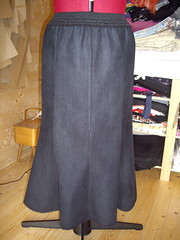
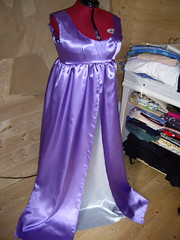
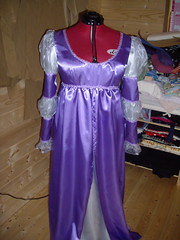
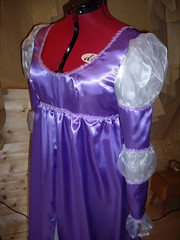
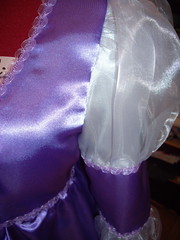
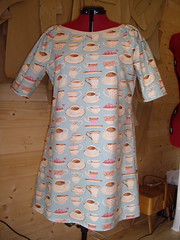
This is my latest experiment - a circle skirt with an elasticated waistband. For those of you who read my elasticated a-line skirt tutorial, this one is made in exactly the same way. Instead of being triangular, the pattern piece is a quarter circle, which you then cut on a double fold in the fabric.

You have to be a bit careful with prints and circle skirts. If the print only goes one way up, you can end up with it going skew-wiff at the side seams. This particular print is so busy that it doesn't really matter which way up it goes! Circle skirts also take up quite a lot of fabric. You can get one of my a-line skirts out of a metre and a half of fabric, but the circle skirt takes at least three metres. You also need five metres of trimming for the hem.

Koi fabric
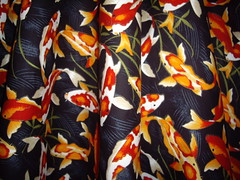
The print is lots of koi, highlighted with gold.


Koi circle skirt - without petticoat Koi circle skirt - with petticoat


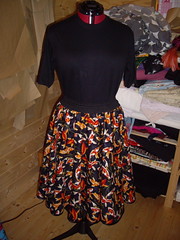
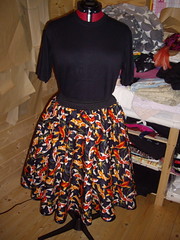
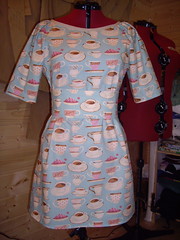
Here you can see the skirt displayed without and then with a petticoat underneath.

I was quite surprised the first time I made a circle skirt and saw it without a petticoat. You see full skirts so often as part of 1950s fashion illustrations, and they're always drawn with the expectation that they're going to be filled out with lots of petticoats. They look so different when they're on their own - very flat, and almost disappointing.

I plan to wear this one to work tomorrow, without a petticoat. The one on the mannequin is a bit too tight for me these days, and I don't fancy wresting with thirteen metres of dress net and fifty metres of trimming to make a new one before tomorrow morning! I keep thinking that perhaps I'll buy one instead, from Petticoat Perfection, but somehow that seems like cheating, when I'm perfectly capable of making my own.

Mind you, I'm perfectly capable of doing lots of things, but that doesn't mean they're all at the top of my to-do list!

Today I invented a rucksack.

Okay, so it's not as though the rucksack hasn't been invented before! But I was thinking yesterday, while I was on the bus on my way to work, and I thought it would be good if I could figure out a way of making rucksacks out of the pillowcases that I'm recycling. Tote bags are great, but they are everywhere, and I have a wonky wrist at the moment, and I'm happier carrying shopping on my back than in my hand.

Anyway, here is my first experiment on the subject:

Recycled duvet cover tote/rucksackRecycled duvet cover tote/rucksack


As you can see, the bag itself is the same size and shape as the Paddington pillowcase tote. Instead of two carrying handles, I've made two long straps. They're fixed at the top of the bag, and adjustable at the bottom. They thread through two-rings, so they can be lengthened or shortened to fit comfortably on your back.

The first two pictures show the bag empty. The second two show it with Stuff inside. You can see that it gapes at the top as soon as you put anything in, which is no good. I added a popper in the centre, which fastens the bag quite neatly. There's also a button on the front of this one. It's purely decorative - I'd already sewn it on before my sewing machine informed me that it didn't feel like making buttonholes today!


I'm really pleased with how this bag came out. It's comfortable to wear, nice and sturdy, and it will carry a lot of weight.

There are a few changes I'd like to make to the design though. At the moment, as soon as you put anything into the bag, all the weight is carried by the popper. This means that the load-bearing capacity of the bag is dictated by the fastener, not by the bag itself, which isn't ideal. Mind you, this can be solved quite easily by simply putting on the bag the other way around. That way the straps hold the weight of the bag against your shoulders, and the bag can't gape open. Maybe the solution's as simple as that?


As always, this one's for sale. £7.50, anyone?
If not, I'll pop it into my Etsy store later in the week.

Sunday 27 April 2008

More slippers...

The monkey slippers are finished!

I added some felt soles, with a decorative blanket stitch to neatly finish off the edges. I hadn't worked blanket stitch for approximately 28 years, but it was lovely to have a look through my Great Aunt's sewing book from 1940, for a little refresher course. :)

Almost finished slippers! Monkey slippers - the finished soles


I love these monkey slippers with a fiery passion, and I have managed to find a single fat quarter of the same fabric, but with the nuts/gourds in purple rather than brown. If I buy it, I can make one more pair of monkey slippers... or of course you can all have something different!

I've also finished my second pair of slippers - these are a slip-on mule style, made from skull and crossbones print fleece.

Skull fleece slippers


The uppers are made from two layers of fleece, with a layer of denim sandwiched in between for strength. The soles are made from a layer of fleece, then denim, then heavy buckram, and finally felt on the bottom. (This is what the soles look like.)

The monkey slippers have a layer of foam rubber in the sole, which makes them extremely squashy and comfortable to walk on. They feel a bit tight the first time you put them on, but after a couple of days the foam compacts down nicely. The mule slippers don't have any foam in the soles at all, which is something I want to change about them. I think it would be nice if they were a bit softer. I also need to make some changes to the felt soles, to make them a little safer. They're a bit slippery on laminate flooring - I've almost gone skating a couple of times!


If anybody would be interested in buying the skull slippers, they're a size 6/39, and can be yours for the bargain prototype price of a fiver!

I'm not taking formal customer orders for slippers yet, but if you'd like to help me by testing out a slightly experimental pair (possibly involving you drawing around your feet), please drop me a comment, and we can work something out. :)


And now, it's back to beating my head against the Zen Cart template setup. I'm supposed to be a professional web designer - I will not let this defeat me!

Tired and Inspired.

Insomnia is not my friend. Half past six on a Sunday morning is a terrible thing to see, especially if you've already been up for two hours. I plan to snooze in the bath later this morning.

Thankfully the internet is a twenty-four hour operation, and instead of wasting half the night on Cute Overload or I Can Has Cheezburger, addictive as they both are, I've been reading lots of inspirational blogs.

This list is mostly for my benefit, so I'll remember where I've been, but I thought it might be useful to other people as well.


Lauren and Emira have a book and a blog called "The Boss of You". It's about being a designer and an entrepreneur, and gives excellent advice on setting up and running your own business.

Jenny Hart talks about Crafting a Business - this article specifically talks about some of the copyright and licensing ideas I that I was discussing the other day.

At decor8, Marcia Zia-Priven talks about finding your niche as a designer.

Design For Mankind has several interesting posts about "Roadmaps", and how they can help you as a creative businessperson. Follow the links to other blogs and websites, for even more inspirational designers and crafters!

I became quite a fan of Seth Godin after I bought one of his books, Small is the New Big. I read his blog regularly, and he always seems to have something relevant to say.


I also bought three interesting books this week:

DIY: Design It Yourself is full of inspirational design ideas, coupled with extremely useful practical advice - something which is missing in a great many craft books!

Fabric Jewellery contains twenty-five projects which I will almost certainly never make. But it's already inspired me to think in different ways about the materials that I already have at home, which is exactly what I'd hoped it would do.

Sustainable Fashion & Textiles: Design Journeys is a series of essays by Kate Fletcher, about various aspects of the fashion industry and how they can be approached in a more ethical manner. I haven't read this yet (6:30 on a Sunday morning is probably not the best time to start!), but I'm looking forward to learning some interesting things, and seeing what differences I can make myself.


As it happens, I didn't exactly buy that last book - I bartered it for one of my duvet cover skirts. I'm more than happy to be paid in goods rather than money (sometimes - books don't pay the bills!), so if I've made something that you like, please feel free to barter for it, if you've got something that I might like in exhange.

Tuesday 22 April 2008

Everybody needs monkey slippers!

Monkey slippers!


Today I have been mostly making monkey slippers!

I promised to make a pair of slippers for a friend, so I thought I'd better make a prototype for myself first, to figure a few things out. I had just enough monkey fabric left from my Superbuzzy order, so I couldn't resist using it up.

I have plans to make some more, probably out of fleece, and a slip-on/mule style with some of my leftover fancy fabrics. This is all part of the Grand Shoe Plan, but I figured that slippers would be a good starting point.

This is how I made them...

Pieces for a pair of monkey slippers.
Here you can see (almost) all of the necessary pieces. For the uppers, there's the monkey fabric. For the lining I used some cream poly/cotton, which is fused to a piece of batting. (That's the squashy stuff.) For the soles, there are two pieces of cream poly/cotton, each fused to heavy interfacing. Between them goes a piece of 1" upholstery foam.

Insoles and uppers, ready to go...
These are the upper pieces, sewn together and turned right sides out, and the sole pieces with the foam sandwiched between them.

Insoles and uppers pinned together...
The uppers and the soles pinned together. I learnt a few things at this stage:
  • Press the uppers before you sew them on to the soles

  • Don't bother pinning and machine basting. Hand basting is actually quicker and easier for this.

  • If you have a fine upholstery needle.

I also left out the elastic which was suggested for the back of the heel. The slippers do stay on without it, but I think I'll be adding it in next time, to stop them from gaping.

Almost finished slippers!
Ta-daa! They look finished!

Slippers with no sole...
Until you turn them over...

I'll be buying felt for the soles tomorrow! I might also add a bit of decorative top stitching around the uppers.

And there you have it. Monkey slippers!


[edit] I forgot to say - I made these using Burda 7978 as a starting point, and then getting creative with a book about making your own shoes. Feel free to make your own!

Monday 21 April 2008

Recycled pinstriped skirt...

I had been planning to make some slippers today, but I realised that I was missing a vital ingredient - the soles! I'll work on those another time.

Instead, I fished out two pairs of my fiancé's trousers, which had been in a box destined for the charity shop. They were made from a really nice heavy brushed cotton, with a faint narrow pinstripe. I decided they'd be much better off being given a new home in my wardrobe, so I turned them into a skirt!

Recycled pinstriped skirt


It turned out to be a sort of fishtail shape - straight to the knees, and then flared out at the hem. This was dictated by the shape of the trouser pieces, once I'd cut them up. The waistline is in my usual choice of bomber jacket elastic, and there's a very narrow lace trim around the bottom.

I'm now quite tempted to raid a couple of charity shops, and see what they've got in the way of interesting trousers. Two different pairs, in alternating panels, might make a really pretty skirt.

Thinking about Creative Commons licensing.

I've been thinking about copyright and Creative Commons licensing for a little while, and I'd be interested to hear your thoughts on the subject.

What I want to do is this:

1) Write a simple knitting pattern.
2) Sell it to people.
3) Allow people to sell items that they've made by following my pattern.

Normally, the default position is that I retain the copyright to that knitting pattern, and that whilst people are free to knit the item for their own personal use, they're not allowed to sell anything that they make from my instructions.

Personally, I don't have a problem with people knitting an item that they've made from my pattern, and popping it into their Etsy store, as long as it's apparent that the original pattern is mine, and that I can be credited for it in some way. I feel as though the pattern and the work produced from it are two separate things, and in that in this specific situation it makes sense to treat them as such.

I've been reading through the Creative Commons website, and although I still have plenty of small print to check, I think there are licenses which would make this possible.

I've also seen it in action on the internet... Amy Karol, also known as Angry Chicken, has written a book of sewing patterns, called Bend-The-Rules Sewing. There's a Flickr group for the book to encourage people to showcase the items that they've made, which I think is a really nice idea. But the really exciting thing is that Amy Karol and her publishers are allowing people to make and sell items from her patterns, as long as a certain disclaimer is in place declaring that the pattern itself still belongs to Amy.

I think this approach is an absolute blessing for crafters everywhere! Lots of people are great at knitting, for example, but wouldn't know where to begin to write their own patterns. But if they want to sell anything they've knitted, they can't. Not if they've used a pattern from a published book, a magazine, or even a free pattern that they found online. Yes, people are doing it, but it's stated very clearly that they shouldn't be.

The reason I don't sell a lot of the dresses that I've been making on my website is that I'm not allowed. I'm a dressmaker, not a pattern drafter - they're two quite different sets of skills. But all of the commercial sewing patterns are copyrighted, so the only way that I can use them is to make one dress, for one person. Selling multiples of Rhona's latest dress on my website for example, even if I clearly state that the pattern itself was produced by McCalls, is strictly in breach of copyright.

So where do knitters and dressmakers and craftspeople go, if they're more interested in doing the practical work than writing the patterns? This is where the concept of separating the pattern itself from the work that's produced from it comes in, and I think that it's an excellent idea.

Sunday 20 April 2008

Paddington Shopping Bag...

This is what I've been up to today - as well as finishing Rhona's dress, I've made a Paddington shopping bag at the request of Sarahloo.

Paddington shopping bag


It's a big bag, quite a lot bigger than the totes that I've made previously. It's roughly A3 in size, and the handles are short ones. They won't go over your shoulder, but you can carry the bag in your hand without it dragging on the floor.

I've got quite a lot of pillowcases in the Shed - most of them came with the duvet covers I've been buying to make skirts from. I can get two of these bags out of one pillowcase, so I'll be running up a lot more in the not-too-distant future. I particularly like the fact that there won't be any leftover fabric at all, by the time I've finished.

I've signed up for the Rising Sun Art Market in September and November, and I'm on the reserve list for July. I'll be taking these new bags along with me, as well as lots of badges, and anything else I happen to make in the meantime!

Monday 14 April 2008

The sleeves make all the difference...

This is McCalls 5444, last seen in February, languishing without sleeves.

Rhona came over last week for her fitting, so I've now been able to add the sleeves and most of the trimmings.

M5444 - work in progress M5444 - sleeves
M5444 - sleeves M5444 - sleeves and trim


I did cheat a bit on the sleeves... the outer layer is made up of seven pieces for each sleeve, and the lining was supposed to be another four. Rather than cutting and assembling 22 pieces, I decided to cut the sleeve linings in one piece. I put together the outer layer, pressed all the seams, and then traced around the finished piece to make a template for the lining. Much better than having all those seams on the inside for no real reason!

The purple organza trim was a lucky find at work, earlier in the year. I grabbed everything that was left on the roll, and thankfully I have plenty. The trim is on every sleeve seam, under the bust and around the neckline.

All I need to do now is make the panel for the eyelets in the back, and add some trimmings to the hem and centre fronts. Hopefully that should go together a bit more quickly than the sleeves!

Friday 11 April 2008

Red and purple outfit for sale...

Remember the red and purple kimono-style top and fishtail skirt that I made for Shira? Unfortunately it was not possible for Shira to wear the outfit to the event for which it was made, and she now has no need for it.

So, the outfit is now looking for a new home.

Shira's outfit - complete!Shira's kimono-esque top


It's made from red and purple shimmer viscose. The red is actually the reverse side of the purple shiny fabric, so most of the outfit is shimmery on the inside!

The top has a low V neckline and kimono-style sleeves which come down to the elbow. The band under the bust is a long belt, which you can tie at the back. It will fit up to a 50" full bust measurement.

The skirt is a gently flared fishtail shape, and fastens with a zip at the centre back. It has no waistband, but is bound with a narrow purple trim. It will fit a waist measurement of 46", and hips up to 53". The length is 40", and the skirt is designed to sit quite low on the waist.

I can make minor alterations to the skirt if necessary, but not to the top.

I'll sell the top and skirt separately for £60 each, or both pieces together for £100.

Please let me know if you're interested, or know anyone who might be!

Saturday 5 April 2008

The Teacup Dress

I've had this Rowan teacup fabric for ages, and wasn't quite sure what to do with it. Eventually I decided that another little tunic dress was the answer.

This time I've made a matching or contrasting waist... thing, to go with it.
I'm not sure whether it's a belt, an obi, a cummerbund, a sash, or what. What would you call it?

Whatever it's called, it's pleated on one side and plain on the other. The plain side is made from the same fabric as the dress. The pleated side and the tie ends are made from plain organic cotton.

The Teacup DressThe Teacup Dress


The organic cotton was absolutely lovely to work with. I steamed any shrinkage out of it before I started, but it kept its shape really well. It takes creases beautifully, and generally behaves itself.

The Rowan teacup fabric is much softer, but I was quite cross to discover that the print isn't properly lined up with the grain of the fabric. As you can see, I chose to go with the grain so that the dress would hang nicely, but this does sadly leave the print looking a bit wonky. Perhaps I should have gone with the print instead.

Tuesday 1 April 2008

Shira's wedding outfit - complete!

The outfit is now safely committed to the post, and will arrive with Shira tomorrow morning. :)

You can see from these photos how much binding I had to make and apply. It took as long to bind the skirt and top as it did to make them in the first place! The contrasting fabric really brings it to life though.

Shira's outfit - complete! Shira's kimono-esque top


The second photo shows off the shimmery fabric to its best advantage, The purple contrast is actually the "right" side of the fabric and the red is the back. I think a whole outfit shimmery-side-out would have been a bit OTT though - and that's me saying it!